









In the demanding environment of marine engineering, the reliable operation of every component is crucial for the safety and efficiency of the vessel. Among these essential components are marine globe valves, which play a vital role in regulating fluid flow within various shipboard systems, including cooling water, fuel oil, and steam lines. While these valves are designed for durability and precise control, they are not immune to wear and tear. Over time, factors such as high pressure, fluctuating temperatures, and the corrosive nature of seawater can lead to operational issues, with leaks being one of the most common and potentially problematic.
A leaking valve might seem like a minor inconvenience initially, perhap
s just a steady drip. However, in a marine setting, even a small leak can rapidly escalate. Depending on the fluid being transported, a neglected leak can result in significant fluid loss, environmental contamination, reduced system efficiency, or even catastrophic failure. Therefore, proactive leak troubleshooting and a robust valve maintenance strategy are imperative for any vessel operator.
This comprehensive guide will delve into the intricacies of troubleshooting common leaks in marine globe valves. We will explore the typical locations where leaks occur, identify the root causes behind them, and provide actionable steps to address these issues before they compromise your vessel’s operations.
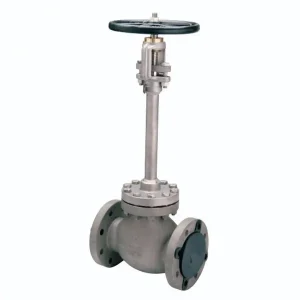
Understanding the Anatomy of a Marine Globe Valve
Before embarking on leak troubleshooting, it is essential to understand the basic anatomy of a marine globe valve. This knowledge will help you pinpoint the source of the problem more effectively.
A typical globe valve consists of several key components:
-
Body: The main pressure-containing structure that houses the internal parts and connects to the piping system.
-
Bonnet: The cover that attaches to the body, providing access to the internal components and housing the stem packing.
-
Stem: A threaded rod that connects the handwheel or actuator to the disc, transmitting the motion required to open or close the valve.
-
Disc (or Plug): The movable element that restricts or allows fluid flow by seating against the valve seat.
-
Seat (or Seat Ring): The stationary surface against which the disc seals to stop the flow.
-
Packing: The sealing material located in the stuffing box (within the bonnet) that prevents fluid from leaking along the stem.
-
Gland and Gland Flange: Components that compress the packing to create a tight seal.
Leaks can occur at various points within this assembly, and identifying the specific location is the first step in effective troubleshooting.
Common Leak Locations and Their Causes
When inspecting a marine globe valve for leaks, there are three primary areas to focus on: the stem (packing leak), the bonnet joint (body-to-bonnet leak), and the internal seat (passing or through-seat leak).
1. Stem Leaks (Packing Leaks)
Stem leaks are arguably the most frequent type of leak encountered in globe valves. They manifest as fluid escaping from the top of the bonnet, around the area where the stem protrudes.
Root Causes:
-
Worn or Degraded Packing: Over time, the packing material (often graphite or PTFE) can lose its elasticity, dry out, or degrade due to continuous friction from stem movement and exposure to harsh fluids or high temperatures.
-
Improper Packing Compression: If the gland nuts are not tightened sufficiently, the packing will not create a tight seal against the stem. Conversely, over-tightening can crush the packing, score the stem, and ultimately lead to premature failure.
-
Damaged Stem: If the stem is scratched, pitted, or bent, even new packing will struggle to maintain a reliable seal. A damaged stem can quickly tear up the packing material during operation.
-
Incorrect Packing Material: Using a packing material that is not compatible with the fluid medium or the operating temperature can result in rapid deterioration and leakage.
Troubleshooting and Remediation:
-
Initial Step: The first and most straightforward action is to try gently tightening the gland nuts. Do this evenly (e.g., turning each nut a quarter turn) and observe if the leak stops. Avoid over-tightening, as this makes the valve difficult to operate and damages the packing.
-
Repacking: If tightening does not resolve the issue, or if the packing is visibly damaged or hardened, it must be replaced. This involves isolating the valve, removing the old packing completely (using a packing extractor tool to avoid scratching the stuffing box wall), and installing new packing rings. Ensure the joints of the new packing rings are staggered (typically at 90 or 120-degree intervals) to prevent a direct leak path.
-
Stem Inspection: During repacking, carefully inspect the stem for any signs of wear, scoring, or bending. If the stem is damaged, it may need to be polished, machined, or replaced entirely to ensure a lasting seal.
2. Bonnet Joint Leaks (Body-to-Bonnet Leaks)
A leak at the bonnet joint occurs between the main valve body and the bonnet cover. This type of leak can be hazardous, especially if the system handles high-pressure steam or corrosive fluids.
Root Causes:
-
Failed Gasket: The most common cause is the deterioration or failure of the gasket sealing the joint. This can happen due to age, thermal cycling, chemical attack, or improper installation.
-
Loose Bonnet Bolts: Vibration, thermal expansion and contraction, or improper initial torquing can cause the bonnet bolts or nuts to loosen over time, compromising the seal.
-
Damaged Flange Faces: If the mating surfaces of the body and bonnet flanges are scratched, pitted, or warped, the gasket will not be able to create a secure seal, even if properly compressed.
-
Improper Torquing Sequence: If the bolts were not tightened in a star or crisscross pattern during assembly, uneven pressure may have been applied to the gasket, leading to a localized leak.
Troubleshooting and Remediation:
-
Initial Step: As with stem leaks, the first step is to attempt to tighten the bonnet bolts. Crucially, this must be done evenly and in a crisscross pattern to ensure uniform compression of the gasket. Caution: Only attempt to tighten bonnet bolts when the system pressure has been reduced or eliminated, as sudden failure of a weakened bolt under full pressure can be dangerous.
-
Gasket Replacement: If tightening fails, the gasket must be replaced. This requires isolating and depressurizing the valve, removing the bonnet, and thoroughly cleaning the flange faces. Inspect the flange faces for any damage. If the surfaces are significantly scored, they may need to be remachined before a new gasket is installed. Ensure the new gasket is the correct material and thickness for the application.
3. Internal Seat Leaks (Passing)
An internal seat leak, also known as passing, occurs when the valve is fully closed but fluid continues to flow through it. This is often detected by observing flow downstream or by hearing a hissing sound within the pipe.
Root Causes:
-
Damaged Disc or Seat: This is a primary cause of internal leakage. Abrasive particles in the fluid can scour and erode the seating surfaces. Additionally, “wire drawing”—a phenomenon where high-velocity fluid eroding a small opening—can severely damage the disc and seat if the valve is frequently used for throttling near the closed position.
-
Debris on the Seat: Foreign matter, such as weld slag, scale, or dirt, can become trapped between the disc and the seat, preventing the valve from closing completely.
-
Bent Stem: If the stem is bent, it may not align the disc properly with the seat, resulting in an uneven seal.
-
Insufficient Actuator Thrust: In automated valves, if the actuator does not provide enough force to seat the disc firmly against system pressure, the valve will leak.
Troubleshooting and Remediation:
-
Flushing: If debris is suspected, try opening and closing the valve a few times (if system conditions permit) to see if the flow flushes the obstruction away.
-
Lapping (Grinding): If the disc or seat has minor scratches or wear, they can often be repaired through a process called lapping. This involves applying a fine grinding compound to the seating surfaces and rotating the disc against the seat to restore a smooth, mating finish.
-
Machining or Replacement: If the damage to the seating surfaces is deep or extensive, lapping will not suffice. The disc and/or the seat ring may need to be remachined or completely replaced.
-
Stem Alignment Check: Inspect the stem for straightness. A bent stem must be replaced to ensure proper seating.
The Importance of Proactive Valve Maintenance
Effective leak troubleshooting is critical, but it is ultimately a reactive process. To truly optimize vessel performance and minimize downtime, a proactive valve maintenance program is essential.
Routine maintenance not only extends the lifespan of your marine globe valves but also significantly reduces the likelihood of unexpected failures and major leaks.
Key Elements of a Proactive Maintenance Program
|
Maintenance Activity |
Frequency |
Description |
|---|---|---|
|
Visual Inspection |
Daily/Weekly |
Inspect valves for visible signs of external leakage (stem, bonnet, body), corrosion, loose bolts, and overall condition. Check for unusual noises or vibrations during operation. |
|
Operational Testing (Cycling) |
Monthly/Quarterly |
Fully open and close valves that are normally static to prevent them from seizing due to scale buildup or corrosion. This also helps assess the condition of the stem and packing. |
|
Lubrication |
Monthly/Quarterly |
Lubricate the stem threads and any exposed moving parts (e.g., yoke nut) with an appropriate, marine-grade grease to reduce friction, prevent wear, and protect against corrosion. |
|
Packing Adjustment |
As Needed |
Monitor the packing gland and tighten the nuts slightly if minor weeping is observed. Do not over-tighten. |
|
Comprehensive Overhaul |
2-5 Years (Depending on service) |
During dry dock periods or major maintenance windows, dismantle critical valves for a thorough internal inspection, cleaning, packing and gasket replacement, and lapping of seating surfaces if necessary. |
Best Practices for Valve Longevity
-
Proper Selection: Ensure the valve selected is appropriate for the specific application, considering the fluid medium, pressure, temperature, and required flow characteristics.
-
Correct Installation: Install valves according to the manufacturer’s guidelines, paying attention to flow direction arrows and ensuring proper piping support to minimize stress on the valve body.
-
Avoid Excessive Throttling: While globe valves can be used for throttling, prolonged operation with the disc very close to the seat can lead to rapid erosion (wire drawing). If precise throttling is frequently required, consider using a specialized control valve.
-
Maintain Fluid Cleanliness: Implement proper filtration and straining systems to minimize the amount of abrasive particles and debris flowing through the piping network, as these are a major cause of seat damage.
Advanced Diagnostic Techniques for Marine Environments
In addition to traditional troubleshooting methods, modern marine engineering is increasingly relying on advanced diagnostic techniques to monitor valve health and predict failures before they occur. These techniques are particularly valuable for critical systems where unexpected downtime is unacceptable.
Acoustic Emission Testing
Acoustic emission (AE) testing is a non-destructive method that detects high-frequency sound waves generated by internal leaks. When fluid escapes through a small gap (such as a damaged seat or packing), it creates turbulence that produces distinct acoustic signatures. By attaching AE sensors to the valve body, technicians can identify the presence and approximate severity of internal passing, even without dismantling the valve.
Thermography
Infrared thermography can be a useful tool for identifying valve issues, particularly in systems handling high-temperature fluids like steam or hot oil. A leaking valve may exhibit an abnormal temperature profile. For example, if a steam valve is internally passing, the downstream pipe will be hotter than expected. Thermography can also detect localized hot spots that might indicate excessive friction in the stem or actuator.
Vibration Analysis
Vibration analysis, while more commonly used for rotating machinery, can also provide insights into valve condition. Excessive vibration in a piping system can loosen valve components (like bonnet bolts) or accelerate wear. Monitoring vibration levels can help identify potential issues before they cause structural damage or leaks.
Conclusion
Marine globe valves are robust and reliable components, but they require attention and care to function optimally in the harsh marine environment. Understanding the common locations and causes of leaks is the foundation of effective troubleshooting. Whether it’s a minor stem weep requiring a simple packing adjustment or a severe internal leak necessitating a complete overhaul, addressing the issue promptly is paramount.
By combining diligent observation, a structured approach to leak troubleshooting, and a commitment to proactive valve maintenance, marine engineers can ensure the integrity of their piping systems, prevent costly downtime, and safeguard the operational readiness of the vessel. Remember that a well-maintained valve is a safe and efficient valve.
FAQ
1. How tight should I make the packing gland nuts on a marine globe valve?
The goal is to tighten the gland nuts just enough to stop the leak, without over-tightening. Over-tightening crushes the packing, increases friction on the stem (making the valve hard to turn), and can cause the stem to score or bend. Tighten the nuts evenly, perhaps a quarter turn at a time, until the leak ceases. If the leak persists after moderate tightening, the packing likely needs to be replaced.
2. Can a leaking marine globe valve be repaired while the system is pressurized?
Generally, it is highly dangerous and not recommended to attempt major repairs, such as repacking or replacing a bonnet gasket, while the system is under pressure. The only exception might be very minor adjustments to the packing gland nuts, provided you are certain of the system pressure and the integrity of the gland studs. For any significant work, the valve must be properly isolated, locked out/tagged out, and the line depressurized and drained.
3. How often should marine globe valves undergo a complete overhaul?
The frequency of a complete overhaul depends heavily on the valve’s application, the fluid it handles (e.g., corrosive seawater vs. clean lubricating oil), the operating pressure and temperature, and how frequently it is cycled. As a general guideline, critical valves might require overhaul every 2 to 3 years, often aligning with the vessel’s dry dock schedule. Less critical valves in benign service might extend to 5 years or more. Regular monitoring and historical maintenance data should guide your specific overhaul intervals.